Search This Blog

Saturday, May 21, 2016

Doordarshan DIGITAL TERRESTRIAL Service- How to watch using Enigma reciver

Door Darshan India has rolled out DVB-T service in 16 major cities of India.
As seen on the ads by DD these services can be watched on smart phone with help of dongle.

For those who already own linux setop box with DVB-T tuner this post will guide how to scan and recive these channels.

1. Flash your settop box with a enigma 2 image such as OpenAtv5.3 or Egami7.x
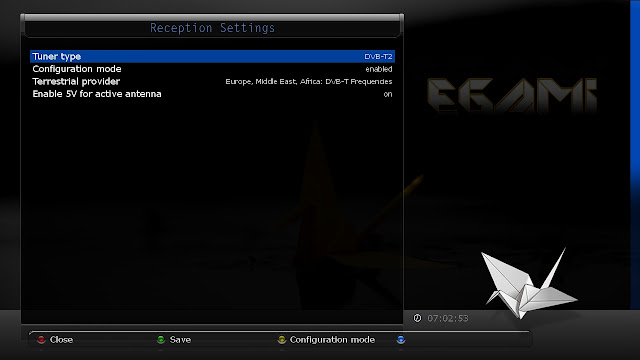
2.Enable DVB-T2 tuner as in below screen


3. Go to Service searching->Manual Scan

4. Select Type of Scan as "User Defined transponder" select Frequency option, enter frequency as 498000 and Bandwidth as 8mhz and rest all as shown in below figure.


 5. Press the green button on remote to start the scan, After scan completes you can find the channels found as below.


6. Press green button to save the channels.

7. Now you can enjoy DVB-T service from Doordarshan free of cost.

8. Make sue you use an antenna, if you are staying far from city limits.

9. Hope DD will soon add more channels.

10. You can also use auto scan but this method is easier and saves time.


Wednesday, October 27, 2010

How to Upgrade Default Opera browser which is pre-loaded in mobile.

******************************************************
Note: use this on your own risk.
******************************************************
If you get error while upgrading like "default game can not be removed/upgraded"

then download the jars and edit the MANIFEST.MF file which is there within the jar.

Use a zip utility like 7zip to view the content of jar file.

Make sure you are not using signed jars as this may not work with those.

While editing just change the MIDlet-Name to something different, like if it is
previously

MIDlet-Name: Opera Mini then change it to

MIDlet-Name: Opera Mini5.1 or MIDlet-Name: Opera MiniNew

and save and replace the old MANIFEST.MF within the jar and transfer the jar to your mobile and then install your software using this new jar.

Like this one can upgrade snaptu, Nimbuzz etc.

Hope you like it.

******************************************************
Note: use this on your own risk.
******************************************************

Monday, May 11, 2009

Setting up TATA SKY DISH Right to recive TS channels

1) Fallow my other post

Watch Free to Air channels

and bring up the LNB settings menu.

2) Now select Insat 4a- 14 as the satellite under manual tuning.

3) Press Yellow button to edit the TP entries.

4) Input below values for

a) Frequency 10970 or 11050 etc.
b) Symbol rate 28500
c) polarization Horizontal (H)
d) FEC as 5/6

and save the settings. Now you can see Signal Strength screen.

Adjust the dish at 83 degree east until you see TATA SKY name appears in the red colored bar below signal level.

See the figure no 5 in my other posting.

Note: More the signal level and lesser the BER is the ideal setting to get good clarity.

That's it, Now wait till the software gets updated in case you have shut it ( not used TS ) for too long time and press any valid channel number and you should be able to see it.

In case you have zero/negative balance left then recharge your account and enjoy the expensive channels !! once again.

Wednesday, February 6, 2008

Author Multiple Titles in to a sigle DVD Disk

I am going to discuss how to record useful programs using video source ( like cable TV, DTH TV, or even a VHS tape player) and a TV tuner card and then editing the content so as to make it advertisement free and then stuff the videos in to a single DVD.

Although there are several softwares are available which records directly to disk on fly with out storing it in to hard disk but it wont allow you to create custom menu disk and the features which you wish to add later and you can't skip irritating advertisements in most of the cases.

Use one of the several video capturing software, for example Intervideo WinDvr 3 is one such capturing tool and trail download is available from their website.

Record your video in mpeg2 format using one such tool by selecting moderate bit rate, video frame size and audio bit rate, sampling frequency ( for DVD it should be 48k) etc.

Now use DVDLabPro or VOBEdit ( VOBEdit is a very use full free tool but you may need to rename the mpeg files to VTS_0x_x.VOB... where x represent the sequence number...) to demux your video files to elementary audio and video streams. This is necessary so as get accurate sync between audio and video when we edit the content later.

Though DVDLabPro is alone is enough for doing all rest of the thing but i found below as a good alternative and easy to use and get good clarity it avoid audio video sync problems.

Use the TMPGEnc DVD Author 1.6 or later to Author the DVD. It is very easy to use tool. You will use the elementary streams instead of original video files here. if you have TMPGEnc Sound Plug-in AC-3 use it for better audio effect.

Add as many titles you want want keeping compilation size in mind .

Remove all the unwanted content from your video like advertisements..., some irritating songs.... in case if you have captured a movie and so on... using cut option available in the edit video section and then compile the project and save the resulted DVD files in a hard disk folder.

If you are satisfied with resulted DVD layout, you can burn it to the suitable blank disk with enough space to accommodate the content or else if you want to add some more to it, import the IFO files (or else vob files... which ever you feel convineant.. i suggest importing IFO files.... for ease) in to DVDLAB pro and create rich menus with custom VGM title menu, Song index, Chapter menu and for favorite scene and some really good fancy looking buttons, etc.

note: the out put is dependent on initial capture settings and make sure you have selected the one which is allowed by these tools (when you try to import non standard video files, you will get error message). Its better to select the standard DVD, 1/2 DVD 1/4th DVD ( PAL or NTSC) formats based on your satisfaction and your hardware available.

The more you spend doing experimentation the more you will master the art of DVD authoring.

DVD authoring is an art as well as hobby. It has got lots of hidden secretes in it.

The more you get involved in to it, you will find more interesting things about it.


Initially it may look weird for some, as it takes hell lot of time but as you practice doing it you all enjoy it i am sure....

One more thing all these softwares are not free so if you liked using it please buy them for supporting the makers or else use trail versions only.

Friday, February 1, 2008

Watch Free to Air channels

Watch Free to Air channels on

TATA SKY SET TOP BOX


Terms and conditions read carefully before proceeding.
*******************************************************************************

The material presented here has no intention to cause any damage to individual or to any company referred or any one related with this. The below help is only provided for enthusiasts who are interested in experimentation and should only be fallowed if they are willing to take any risk in case they might experience in doing so. The author is not responsible for any damage caused directly or indirectly by fallowing this material. Use it on your own risk.

*********************************************************************************


Tata sky is one of the leading DTH provider in India and they are known for their good quality service. You can visit their web site at www.tatasky.com .

Many people have asked me about how to view FTA channels ( Free to air channels ) using TATA SKY set top boxes, thats why I created this blog posting. This particular information is applicable to people at India willing to view some free channels through TATA SKY set top box. however this is equally applicable to other FTA services if you can catch right frequencies /signals.

1) First thing to do is select right LNB frequency.
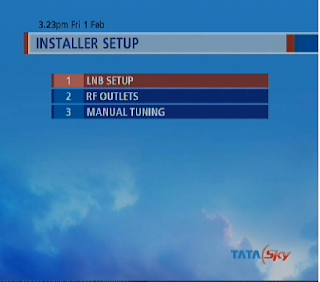
for that press Guide button and navigate to organiser and press 5. This will show you System setting, now press 0, 1, select and you will see Installer Setup - fig 01

Installer Setup - fig 01


2) press select button on your remote again to see LNB Setup screen - fig 02
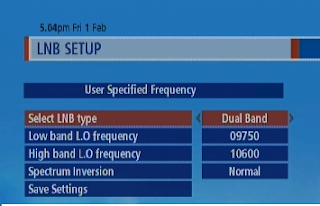
LNB Setup screen - fig 02


3) Select 2nd option i.e, User specified Frequency and you will see the user specified frequency details in that screen. Make sure these values are set as show in fig 03 below. press back button until you reach Installer Setup screen again.
fig 03


4) In Installer Setup menu now select Manual Tuning ( fig -04 ) option and select IN4A-14 as your signal source. Now select Save Setting option. Now you can see Signal Strength screen.

Manual Tuning - fig 04


5) Adjusting the dish position: At this point you will be wondering how to adjust the position of your dish to catch signals from other satellites. This is very important and difficult step to fallow.


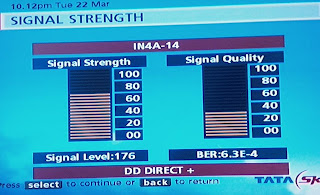
For that you need to point your dish to Insat 4B at 93.5°East so that you can see the service provider name in side the red horizontal stripe (DD DIRECT + in our case) see the below figure Signal Strength - fig 05. If you can not see the provider name then you may have to try repositioning your dish until the name appears in the red colored bar below signal level.

It would be better to take your TV to terrace and adjust the dish position. ( please do this only if you are confident enough to so that you can switch back to TATA SKY signals once you are finished testing with FTA channels.) You can buy an extra dish for experimentation if you want, leaving the TATA SKY dish untouched. I suggest to use an extra dish as tampering with TATA SKY dish may cause you some serious trouble. The choice is yours.
Signal Strength - fig 05


6) Adding channels: Now with dish pointing in the right direction its time to add channels. For that
you need to navigate back to Systems setting screen by pressing back back, back, back and 5 on your remote( press back 3 times and select add channels option) to add channels of your interest which are available on that satellite. See below figure
Adding channels - fig 06
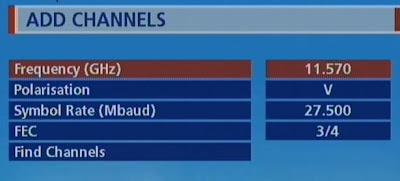


Enter each of the parameter value as show above by referring the table below and leave FEC as 3/4.

S/n.

Transponder Frequency (MHz)

Symbol Rate (ksps)

Polarization

1

10990

27500

Vertical

2

11070

27500

Vertical

3

11150

27500

Vertical

4

11490

27500

Vertical

5

11570

27500

Vertical


Now select find channels option and you can see the below screen.


Wait till channels list displayed


press the yellow button to store or remove the channels. Press the Green or Red button to navigate Up/Down
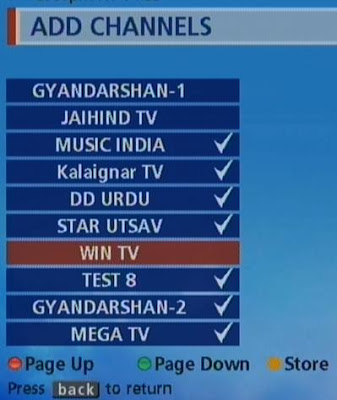


Press back and Repeat the steps for all the frequencies in the above table.


7) Now its time to enjoy all your hard work:
After you are done with all the frequencies listed above in the table navigate to the Other channnels option under Organiser menu and press 7 ( or select other channels by scrolling down). You will be shown with the list of stored channels like below.


Now select the channel you wish to watch.


That's it, we are done. :)

Note: In some case there is a possibility that these set top box may have been locked by the manufacturer and it can not be used to view other signals other than it is customized to use.

I do appreciate comments from readers if they can spend some time.